Import and Export LDC Data - The Data Cycle
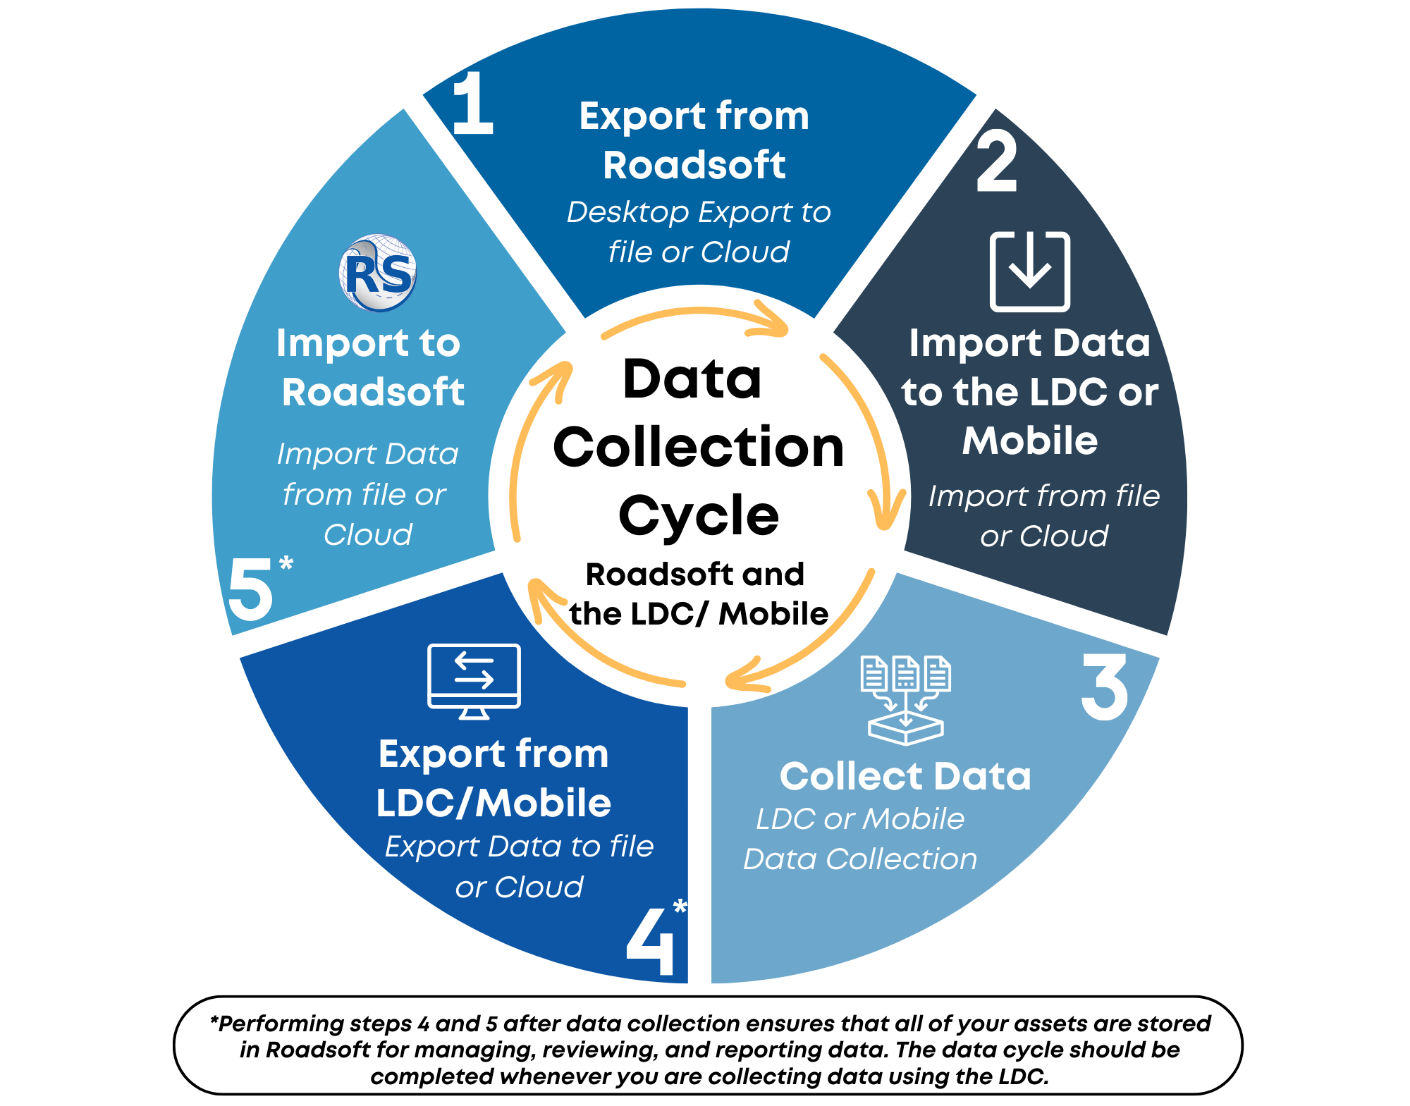
Laptop Data Collector (LDC) and Roadsoft Data Cycle
After successfully installing Roadsoft and the Laptop Data Collector, agencies can begin to export, import, and collect data using the LDC.
Step 1 – Define the Area of Data Collection
If collecting data for roads, such as road condition, rating, or surface type, create a filter containing the desired road network. To create this filter, continue following the steps in this section.
If collecting data for signs, culverts, driveways, and guardrails, either create a filter OR move on to Step 2 – Create LDC Export from Roadsoft.
With the desired layer visible and active (see Use the Map Interface for assistance with layers):
Select Filter from the map options.
Select Filter Builder.
Choose the desired filter field, operator, and value.
Select the Add button to apply the chosen filter criteria.
See Use the Filter Builder for additional help with the Filter Builder.
Repeat step 3 and 4 to add additional filter criteria.
Select the Save option at the top of the window.
Enter a filter name in the Name field.
Select the Save As button.
Select Apply as Filter.
Close the window.
Step 2 – Create LDC Export from Roadsoft
In Roadsoft, select LDC from the main menu options.
Select Export Data for LDC.
Select the Yes button in the window asking, “Are you collecting data for the Asset Management Council (TAMC)?” when collecting PASER data for the TAMC (applicable to road data only and required when collecting PASER data for submitting data to the TAMC). Select No to continue if the data collection if the data collection is not road data or the road data collection is not for TAMC submission.
Select a Data Type(s) from the Export to LDC window by clicking once in the desired checkbox.
Road collection requires the application of a filter and upon selection, the Load Saved Filter window automatically opens. If choosing any other asset, the default setting is to export everything for the selected asset. Select the Open [Asset Name] Filter Builder link to open the Filter Builder and either make a new filter or apply a saved filter. See Use the Filter Builder for help with the Filter Builder.
Select an export option.
Select the Export to Folder radio button to export the data file to a specified folder.
Select an export path option.
Select the Folder icon to choose an Export Path.
Select a file export location in the Browse for Folder window.
Select the OK button to use the current location selection.
Select the Cancel button to exit the window without exporting.
Select the Make New Folder button to create a new folder.
Select the OK button to use the new folder as the export location or select the Cancel button to exit the window without exporting.
Select an existing path using the drop-down list.
Note the chosen export path. The export creates a RStoLDC_[jurisdiction name]_[date & time].ldcz Example: RStoLDC_Houghton(County)_2014_08_14_12_30.ldcz) which is needed for Step 3 – Import the LDC Export into LDC.
Select the Export to Cloud to upload the export to the cloud storage.
Note that a Roadsoft Cloud Key is needed for this option. Agencies can request a Roadsoft Cloud Key from the Center for Technology & Training (CTT). CTT technical support staff typically processes requests within 24 to 48 hours.
Set Cloud Key – Roadsoft
Select the Tools option from the Main Menu Options.
Select the Cloud Management option.
Select the Set Roadsoft Cloud Key… option.
Select the field in the Roadsoft Cloud Key window to enter the key.
Select the OK button to save the cloud key, or select the Cancel button to discard it.
Set Cloud Key – Laptop Data Collector
Note: setting the Roadsoft Cloud Key in the Laptop Data Collector can be accomplished in two different ways – at the login screen and from within the program once it’s running.
Set Could Key at Login Screen:
Open Laptop Data Collector.
Select the Download Database button.
Click on the Yes button.
Select the field in the Roadsoft Cloud Key window to enter the key.
Select the OK button to save the cloud key, or select the Cancel button to discard it.
Set Cloud Key from within the Laptop Data Collector:
Note: The cloud key only needs to be set once. If there is a cloud key stored in the LDC, the Download Database button on the Login Screen will no longer prompt to set the key but will instead show the LDC Cloud Import file list.
Select the Tools option from the Main Menu Options.
Select the Cloud Management option.
Select the Set Roadsoft Cloud Key… option.
Select the field in the Roadsoft Cloud Key window to enter the key.
Select the OK button to save the cloud key, or select the Cancel button to discard it.
Select the Export button to complete the export or select the Cancel button to exit without exporting.
Select the OK button in the Export Created confirmation window.
Step 3 - Import the LDC Export into LDC
If the export file was created using the Export to Folder process, locate the .ldcz file and save it to a removable drive if the file location is not accessible by the LDC. Once the file is accessible by the LDC, move to Step 3 – Import the LDC Export into LDC. If the export file was created using the Export Directly to LDC Data Folder process, or if the export file was accessed using the Export to Cloud option, skip to Step 4 – Start Collecting Data.
Import from file:
Start the Laptop Data Collector (LDC).
Select the Folder icon to the right of the DB field in the LDC login window.
Locate and select the .ldcz file saved in the previous instruction section, Step 2 – Create LDC Export from Roadsoft.
Select the Open button.
Enter a crew name or use the drop-down list to select an existing crew name in the Crew field.
Select the OK button and move to Step 4- Start Data Collecting.
Import from Cloud:
Start the Laptop Data Collector (LDC).
Select the Download Database button on the LDC login window.
Select the file from the list in the LDC Cloud Import window.
Select the Download and Import button.
Enter a crew name or use the drop-down list to select an existing crew name in the Crew field.
Select the OK button and move to Step 4- Start Data Collecting.
Step 4 – Start Collecting Data
The LDC is now ready for collecting data based on the imported filter criteria. For example, if a road filter export from Roadsoft included the Latest Surface Rating with values of Poor, Very Poor, and Failed – only roads that fit those criteria are editable for collection in the LDC. See Connect a GPS for help with GPS connection to the LDC.
Certain items are not editable and/or collectable using the LDC:
Road framework
Crash Data
Traffic Count Data
Step 5 - Export Collected Data from LDC
Once data collection is complete in the LDC, export the data collection from the LDC for import into Roadsoft.
Select the File option from the main menu.
Select an export option.
Select the Export DB/Data to Roadsoft… to export the data file to a specified folder.
Export to Cloud:
Click the Export to Cloud option.
Click the Export button.
Export to Path:
Select an export path option.
Select the Folder icon to choose an Export Path.
Select a file export location in the Browse for Folder window.
Select the OK button to use the current location selection.
Select the Cancel button to exit the window without exporting.
Select the Make New Folder button to create a new folder.
Select the OK button to use the new folder as the export location or select the Cancel button to exit the window without exporting.
Select an existing path using the drop-down list.
Note the chosen export path. The export creates a LDCtoRS_[jurisdiction name]_[date & time].ldc2rs Example: LDCtoRS_Houghton(County)_2014_08_14_12_30.ldc2rs) which is needed for Step 6 – Import Collected Data to Roadsoft.
Select the Export button to complete the export or select the Cancel button to exit without exporting.
Select the OK button in the Export Created confirmation window.
Select the Upload Data to Roadsoft… option to export the data directly to Roadsoft.
Applicable only when Roadsoft and the LDC are installed on the same machine.
Select the Yes button to complete the export directly into Roadsoft.
Select the OK button in the Upload Successful window.
Select the No button to exit the Upload Data to Roadsoft window without exporting.
If the export file was created using the Export DB/Data to Roadsoft process, locate the .ldc2rs file and save it to a removable drive if the location is not accessible by the LDC. Once the file is accessible by the LDC, move to Step 6 – Import Collected Data to Roadsoft. If the export file was created using the Upload Data to Roadsoft process, skip Step 6 – Import Collected Data to Roadsoft.
Step 6 - Import Collected Data to Roadsoft
With Roadsoft open:
Select the LDC option from the main menu.
Select Import Data from LDC.
Select the Import From option (Cloud or File).
Import from Cloud:
Select the Import LDC Data button or select the Cancel button to exit without exporting.
Select the file to import from the list in the LDC Cloud Import window.
Select the Download and Import button.
Select the OK button to download and import the file, or select the Cancel button to return to the LDC Cloud Import window file list.
Select the location on the computer to save the LDCtoRS*.ldc2rs file.
Select the OK button to download and import the file, or select the Cancel button to return to the LDC Cloud Import window file list.
Note that once a file has been imported from the cloud it will no longer be available in the LDC Cloud Import window file list.
Import from File:
Select the Browse for LDC Export button.
Locate and select the saved LDCtoRS*.ldc2rs file saved in the previous instruction section, Step 5 – Export Collected Data from LDC – Export to Path.
Select the Open button to continue with the export or select the Cancel button to return to the Import Data from LDC window.
Select the Import LDC Data button or select the Cancel button to exit without exporting.
Select the Yes button in the window asking, “It is highly recommended that you perform a Roadsoft Data Backup prior to importing LDC data. Do you wish to do a backup prior to importing?” to complete a backup prior to importing (highly recommended).
Select a backup file location and create the backup. Import will automatically start when the backup is complete.
See Backup, Move & Restore Databases for additional assistance with backing up the database.
Select the No button to continue the import without backing up.
Select the Cancel button to exit without importing.
It is important to perform all steps of the Data Cycle before using the LDC for further data collection. This ensures that the most up-to-date data is used.