Setup Roadsoft Mobile
Roadsoft Mobile is an app-based version of Roadsoft designed for smartphones and tablets, similar to how the Laptop Date Collector (LDC) is a version of Roadsoft designed to work best on laptops. Roadsoft Mobile is available to download at no cost from the Google Play Store for Android devices (version 4.0.3 or higher) or from Apple’s App Store for iOS devices (version 8.3 and up). Mobile can add, edit, and delete assets and related data as well as manage work orders, maintenance, inspections, and stream crossing surveys. Currently, Roadsoft Mobile has modules for managing data on for culverts, roads, sidewalks and signs. Other Roadsoft module options may become available in the future. For help finding buttons and options in Roadsoft Mobile, see Navigate Roadsoft Mobile.
Roadsoft and Mobile share data via the cloud. Agencies need a Roadsoft Cloud Key in order to access the cloud and submit or retrieve data between devices. One key can connect multiple computers and mobile devices, so an agency only needs a single key to connect all their devices. Agencies can request a Roadsoft Cloud Key from the Center for Technology & Training (CTT). CTT technical support staff typically processes requests within 24 to 48 hours. After obtaining a cloud key for the agency, enter it into both the Roadsoft desktop program and Roadsoft Mobile to begin exchanging data.
Android devices can change between light and dark background themes for Mobile to help optimize visibility. During the day, it is ideal to use light colored mobile backgrounds so users can read them in sunlight. However, during the night a darker background helps prevent too much light from reaching a user’s eyes and making it hard to see. This feature is not available for iOS users.
Application setting options are accessible through the Settings button at the top right corner of the map screen in Roadsoft Mobile. The options can modify Roadsoft Mobile features and adjust map and menu options, including controlling what assets appear on the map and what tabs are available for each asset module.
Due to differences between mobile devices and operating systems some buttons, tabs, and other elements may appear differently than documented.
Set Cloud Key – Desktop
With desktop Roadsoft open:
Select the Tools option from the Main Menu Options.
For help navigating Roadsoft’s map interface, see Use the Map Interface
Select the Cloud Management option.
Select the Set Roadsoft Cloud Key… option.
Select the field in the Roadsoft Cloud Key window to enter the key.
Select the OK button to save the cloud key, or select the Cancel button to discard it.
Set Cloud Key – Mobile
With Roadsoft Mobile open:
Select the Menu button from the Manage Database menu.
Select the Set Roadsoft Cloud Key option.
Select the Key field.
Enter the cloud key code into the Key field.
Select the Validate Key button.
A dialog box will appear indicating validation in process. When completed, a message will appear below the Validate Key button indicating success or failure. If a failure occurs, review the instructions provided in the window for troubleshooting options.
Select the Done button after validation successfully completes.
Change Background Theme
With Roadsoft Mobile open:
Select the Menu button from the Manage Database menu.
Select the Change Theme option.
Select the Light or Dark option.
Select the Apply option to save the selection, or select the Cancel button to discard it.
Change Application Settings
With a file open in Roadsoft Mobile:
Select the Settings button  .
.
Select the Module Tabs button to change the order and visibility of module tabs.
For instructions on editing tabs, see the Rearrange Tab Order section below.
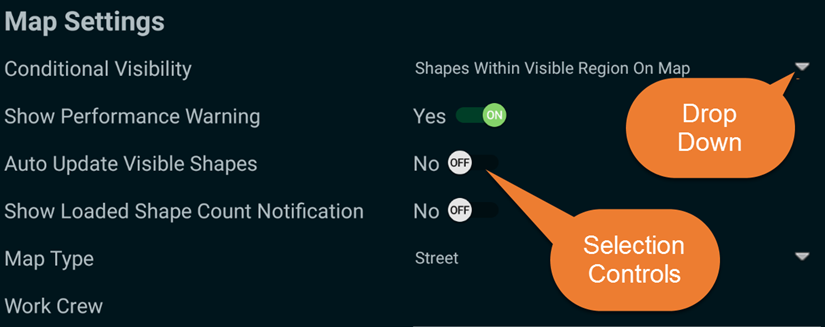
Select the Condition visibility drop-down list (shown in the image below) to select a visibility setting.
Select the Show Performance Warning switch to set whether a warning dialogue box when shapes need a longer time than normal to appear on the map.
Select the Auto Update Visible Shapes switch to set whether asset shapes automatically populate on the map or if the app needs to be refreshed manually to show new shapes.
Select the Show Loaded Shape Count Notification switch to set whether a dialogue box appears when the map refreshes displaying the number of lading shapes on the map.
Select the Map Type drop-down list to choose the type of map displayed in the Map tab.
Select the Work Crew field to enter a work crew name.
Select the Save button to confirm any setting changes, or select the Undo button to discard them.
Rearrange Tab Order
With a file open in Roadsoft Mobile:
Select the Back Arrow button to open the module list.
Select the desired asset type from the module.
Rearranging tabs only affects the tabs for the current asset. To change the tabs for another asset, open it from the Available Modules list first.
Select the Back Arrow button to close the module list.
Select the Settings button  .
.
Select the Module Tabs button.
Select the desired tab from the list.
Select the Hide/Show button to hide or display the selected tab in the tab list.
Select the Up and Down buttons to change the tab order.
Select the Ok button to save any changes, or select the Cancel button to discard them.
Select the Save button to confirm any setting changes, or select the Undo button to discard them.