TAMC Projects Export for IRT Submission
Each year road agencies are required to collect and submit their road and bridge project information to the Transportation Asset Management Council’s (TAMC) Investment Reporting Tool (IRT). This tool is the only way to submit treatment data. For more information on what the IRT is and for additional help with the IRT see, TAMC’s IRT Training page. See TAMC Treatment Definitions & Project Classification for help with the TAMC project classifications as they pertain to Roadsoft.
Agencies should determine which projects to include for IRT submittal based on the general guidance If provided by the TAMC. As a general rule, agencies should include any complete (or planned to be complete) capital preventative maintenance (CPM), rehabilitation, and reconstruction projects (typically projects that will likely impact the PASER rating on a given segment) where expenditure recording occurs on the agencies financial records. It is not necessary to report routine maintenance items such as snow removal, pothole patching, etc. See the TAMC document, Investment Reporting 101 & Key Points on IRT/ADARS for more information.
Agencies should enter projects that extend beyond a single fiscal year based on the planned open to traffic date. For example, if project design starts in 2023 and is scheduled to complete (open to traffic) in 2024, record the project as completed in 2024. The agency finance team enters a combined total cost for the year 2024 which includes costs incurred in 2023. Be aware that costs for the Asset Management page in ADARS do not match other parts of the Act 51 report which are always based on fiscal year costs versus a total project cost when covering multiple years. These costs are not comparable.
When agencies record projects using Roadsoft, this project data can be exported and uploaded to the IRT. This guide explains how to create, review, and submit your Roadsoft project exports for upload to the IRT.
If an agency needs to create project data, refer to the Use the Project Builder document before continuing to the next step.
The most recent version of Roadsoft must be used to submit project data.
Select a TAMC Export
Roadsoft contains the three required exports as defined by the TAMC:
Export Road Completed Treatments by Location (Completed Fiscal Year)
Export Road Planned/Scheduled Treatments by Location (Next 3 Fiscal Years)
Export Bridge Completed and Planned Treatments by Location (Completed and Next 3 Fiscal Years).
Select the TAMC option from the main menu.
Select the desired export option. The TAMC [Status] Project (s) ([Export Type] Fiscal Year) window should appear.
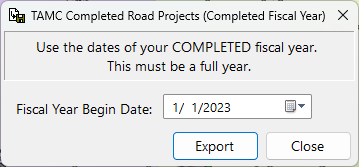
Enter the Fiscal Year Begin Date and Fiscal Year End Date for the completed fiscal year.
The dates entered in the Fiscal Year Begin Date and Fiscal Year End Date fields determine the range of projects that will be included in this export.
Roadsoft requires this range to be a full year. For the purposes of TAMC reporting, the applicable calendar year is automatically selected by default (agencies whose fiscal year does not follow the calendar year must change the dates).
Select the Export button. The [Status] Projects Export window appears.
Navigation, Review, & Export
After making export and date selections, the [Status] Projects Export opens. Depending on the export selected, the table will contain data from all the road or bridge projects that are completed for the selected fiscal year or planned for the next three fiscal years. Review the Right-click Menu Options section below for navigational assistance, otherwise skip to either of the following Review & Export Project Data sections.
Right-click Menu Options
Right-click on the [Status] Projects Export window. A drop-down list of options will appear.
Select Include All to include all data in the export.
Select Exclude All to exclude all data from the export.
Select Include Highlighted to include all the highlighted rows in the export.
Select Exclude Highlighted to exclude all the highlighted rows from the export.
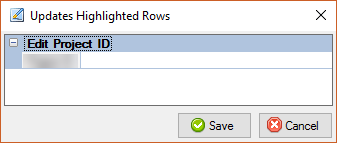
The remaining right-click options are available to edit the indicated fields for all currently highlighted rows. These options are especially useful when treatments are not entered in the Project Builder.
Set Number of Lanes on Highlighted Rows edits the number of lanes in the highlighted row(s).
Set Life Expectancy on Highlighted Rows edits the life expectancy of a treatment in the highlighted row(s).
Set Project ID on Highlighted Rows edits the project IDs of the highlighted row(s).
Set Cost on Highlighted Rows edits the cost field in the highlighted row(s).
Set Reactionary on Highlighted Rows toggles the reactionary field ON or OFF in the highlighted row(s).
Set Warranty on Highlighted Rows toggles the warranty field ON or OFF in the highlighted row(s).
Edit TAMC Project Classification - is a direct link to the Treatment Definition Form where the TAMC Project Classification can be set (same as Step 1 below).
Review & Export Project Data – Road Treatments (Current & Planned)
Verify that each project has a corresponding TAMC Project Classification.
TAMC Project Classification is a required field. If this field value is set to “not specified”, it must be defined before exporting the data. For help adding or editing TAMC Project Classification values on existing treatments, see Define-Map Treatments for TAMC - Surface Definition. See TAMC Treatment Definitions & Project Classification for help with the newly defined TAMC project classifications as they pertain to Roadsoft.
Select projects for export.
Review the Highlighting Rows, Right-click Menu Options, and Additional Navigation Options sections below for navigational assistance. Skip ahead to step 3 if navigational assistance isn’t necessary.
Highlighting Rows
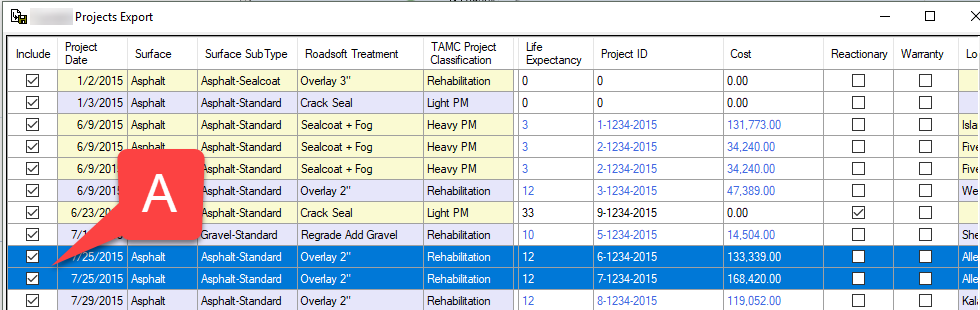
Highlight rows (indicated by callout A in the image below) to edit data and include or exclude specific rows from the IRT export. Checked rows will be involved in the TAMC export. It is recommended that all rows be included (even if they were previously submitted) unless they are routine maintenance projects, or they are roads not owned by your agency.
Select one row by clicking on the desired row.
Select more than one consecutive row by selecting a row and holding the Shift key on the keyboard and selecting the last row in the consecutive rows being included in the selection or by clicking once on a row, holding the mouse button down, and dragging the cursor over the desired rows.
Select more than one non-consecutive row by selecting a row and holding the Ctrl (control) key on the keyboard and selecting any additional non-consecutive rows as desired.
Additional Navigation Options
Scroll through all columns by dragging the bottom scroll bar back and forth or using the arrows at either end of the scrollbar.
Scroll through each row of information by dragging the right scroll bar up and down or using the arrows on the top and bottom of the scrollbar.
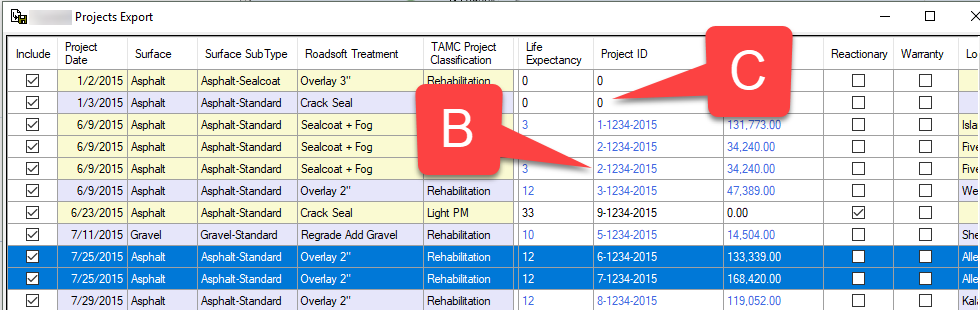
Blue text is read-only (indicated by callout B in the image above) in the Projects Export window. The Read-only text is editable from the Project Builder. Double-click on any read-only text to open the associated project in the Project Builder.
Treatments appearing in the Project Export window which were not entered in the Project Builder are editable from the Project Export window (indicated by callout C in the image above). Single-click on the editable field and begin typing the new field value (Reactionary and Warranty fields do not require typing).
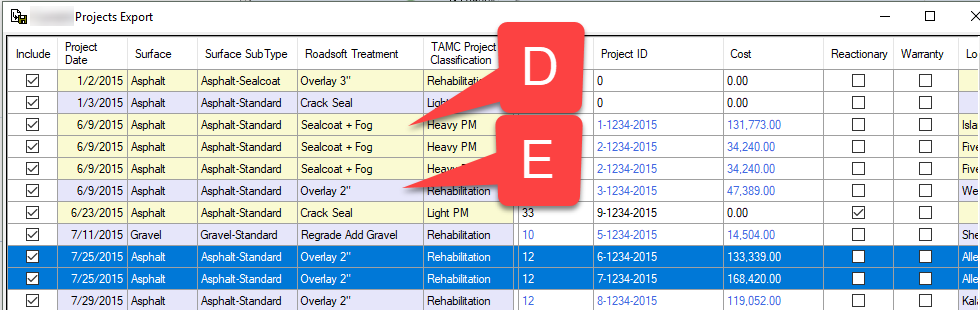
Roadsoft attempts to group treatments together in order to visually indicate the same project according to date, surface type, and treatment details. The groupings are indicated by alternating yellow row shading (indicated by callout D in the image above) and gray row shading (indicated by callout E in the image above).
Verify that each project has the required information and use drop-down selections or enter text where applicable to add/edit data.
There are seven fields in the [Status] Projects Export window that are editable, five fields are required.
If the project was created in the Project Builder then updates must occur there; otherwise, enter values directly in the [Status] Project Export table. Keep in mind that values entered in the table are not reflected in the Project Builder or Road Module.
Lanes (required) – number of lanes as applicable for project segment(s). Value is automatically applied from segment Physical/Design inventory data in the Road Module when available. Update it if the project does not apply to all the lanes.
Life Expectancy (required) – expected life of the treatment. Value is automatically filled from the Project Builder when available.
Project ID (required) – unique project identifier. Value is automatically filled from the Project Builder when available.
Project IDs must be unique for each project/jurisdiction.
Tips for Using a Project ID
Use a Project ID that fits the agency’s business needs. Keep in mind that the Project ID will be the common reference within your office between the IRT and ADARS.
A Project ID can be up to 50 characters long and can include both numbers and letters.
Both MDOT Project IDs or specific agency IDs can be used for each project.
Project IDs must be unique within your jurisdiction for each project entered. For example, two different treatments cannot share the same ID as they are considered different projects.
Cost – total cost of the project (helpful for record keeping purposes). Value is automatically filled from the Project Builder when available. Each row of data for the same project should have the same cost value; you do not have to break up project costs by segment.
Cost is included in the export from Roadsoft for the IRT, but cost does not transfer from the IRT to the Act 51 Distribution and Reporting System (ADARS). For additional help with ADARS, see TAMC’s ADARS page.
Reactionary (required) – identification as to whether the project is a result of an unplanned event (natural or otherwise). Value is automatically filled from the Project Builder when available.
Field default is No/Unknown.
Warranty (required) – identification as to whether the project is covered under warranty. Value is automatically filled from the Project Builder when available.
Field default is No/Unknown.
Comment – text field available for adding any clarifying information to the project. Value is automatically filled from the Memo field in the Project Builder when available.
Select the Save button to save any newly entered or edited values to the TAMC export data.
Changes made in the [Status ] Projects Export window do NOT update the Project Builder or Road Module. Make changes in the Project Builder or Road Module as needed.
Select the Preview button to view the selected project data in a printable report form.
Complete the export.
Select the Export button
When data are incomplete in the table a Missing [field name] Information window appears indicating the missing value(s). When this occurs, select the OK button and correct the missing values.
Choose a location to save the export file
Select the Save button
Select Yes in the Upload File to IRT Website window to be directed automatically to the TAMC website, where you can upload the file using the Reporting Hub, or select the No button to return to the Completed Road Projects Export form.
The export file must be manually uploaded to the IRT.
See TAMC’s IRT Training page for more information on uploading the export file into the IRT.
Review & Export Project Data – Bridge Maintenance
Verify that each project has the required information.
All data comes from bridge maintenance records, see Add, Edit & Delete Local Bridge Maintenance for additional help.
Select projects to export.
Review the Highlighting Rows, Right-click Menu Options, and Additional Navigation Options sections above for navigational assistance when necessary.
TAMC Project Classification (required) – Value is automatically filled from Bridge Maintenance when available.
If this field value is set to “not specified”, it must be defined before exporting the data. For help adding or editing TAMC Project Class values on existing bridge maintenance, see Add, Edit, & Delete Local Bridge Maintenance.
TAMC Treatment Type Description (required) – Value is automatically filled from Bridge Maintenance when available.
If this field value is set to “not specified”, it must be defined before exporting the data. For help adding or editing TAMC Project Class values on existing bridge maintenance, see Add, Edit, & Delete Local Bridge Maintenance.
Maintenance Date (required) – expected project completion date. Value is automatically filled from Bridge Maintenance when available.
Cost (required) – total cost of the project. Value is automatically filled from Bridge Maintenance when available.
Cost is included in the export from Roadsoft for the IRT, and the IRT is the final destination for bridge project cost. Bridge project cost does not enter ADARS.
Life Expectancy (required) – expected life of the treatment. Value is automatically filled from Bridge Maintenance when available.
Project ID (required) – unique project identifier. Value is automatically filled from Bridge Maintenance when available.
Project IDs must be unique for each project/jurisdiction.
Tips for Using a Project ID
Use a Project ID that fits the agency’s business needs. Keep in mind that the Project ID will be the common reference within your office between the IRT and ADARS.
A Project ID can be up to 50 characters long and can include both numbers and letters.
Both MDOT Project IDs or specific agency IDs can be used for each project.
Project IDs must be unique within your jurisdiction for each project entered. For example, two different treatments cannot share the same ID as they are considered different projects.
Multi-Year – indicates maintenance that is part of a part of a 3-year plan. Value is automatically filled from Bridge Maintenance when available.
Reactionary – indicates unplanned maintenance in response to an unforeseen event (natural or otherwise). Value is automatically filled from Bridge Maintenance when available.
Warranty – identification as to whether the project is covered under warranty. Value is automatically filled from Bridge Maintenance when available.
Comment – text field available for adding any clarifying information to the maintenance record. Value is automatically filled from Bridge Maintenance when available.
Select the Preview button to view the selected project data in a printable report form.
Complete the export.
Select the Export button.
Choose a location to save the export file.
Select the Save button.
Select Yes in the Upload File to IRT Website window to be directed automatically to the TAMC website, where you can upload the file using the Reporting Hub, or select the No button to return to the Completed Road Projects Export form.
The export file must be manually uploaded to the IRT.
See TAMC’s IRT Training page for more information on uploading the export file into the IRT.