Web Integration – Google/Bing Maps & KML Files
Roadsoft has a feature which allows Roadsoft to integrate with Google & Bing map tools such as Google Maps, Bing Maps and Google Earth. Roadsoft is capable of passing location data (a point on a map) and also can pass detailed data from the active Roadsoft database (PRNo, mile points, ratings, etc.) to these other maps.
When a selection is made in Roadsoft, a web integration option can be specified. Once specified, the selected location will open in a web browser to the same selection point on the Google/Bing map. All selectable items (roads, crashes, signs, culverts, etc.) can be used as a selection for use with web integration.
One key function of web integration is it allows Roadsoft users to share maps and Roadsoft data with those that do not have Roadsoft (either by URL or file). There are many other possible uses for Roadsoft web integration. For example, agencies could use it for crash location review (use Google Street View or Google Earth) to quickly review the area of the crash), or guardrail location (use Google Street View or Google Earth) to review end types.
Using Google Maps or Bing Maps with Roadsoft
PROS: Shareable URL
CONS: No passed data
In Roadsoft, make a selection.
Right-click on the map.
Select Google/Bing Integration from the list.
Select Open Location in Google Maps (or Open Location in Bing Maps).
A web browser will open up a map to the location.
From the Roadsoft map, the coordinates listed at the bottom left of the map can be selected by selecting the coordinates and selecting either View Current Map Extents in Google Maps or View Current Map Extents in Bing Maps.
Using Google Street View with Roadsoft
PROS: Shareable URL, 360˚ view of location
CONS: No passed data, Views may not be available in all areas/views could be outdated
In Roadsoft, make a selection.
Right-click on the map.
Select Google/Bing Integration from the list.
Select Open Location in Google Street View.
A web browser will open up Google Street View at the location.
Using Google Earth with Roadsoft
Google Earth must be installed prior to using this feature in Roadsoft.
See http://www.google.com/earth/index.html for more information (free download available).
PROS: Shareable URL, Passed data, Interactive, 360˚ view of location
CONS: Views may not be available in all areas/views could be outdated
In Roadsoft, make a selection.
Right-click on the map.
Select Google/Bing Integration from the list.
Select Open Selection in Google Earth.
An Export GIS Data window will appear, select the desired data fields to pass from Roadsoft to Google Earth. The selection will open in the Google Earth application.
Creating a KML file with Roadsoft
PROS: Shareable Google Earth file, Passed data, Interactive, 360˚ view of location
CONS: Views may not be available in all areas/views could be outdated
In Roadsoft, make a selection.
Right-click on the map.
Select Google/Bing Integration from the list.
Select Save Selection as KML.
Choose the desired fields to export from the list in the left column.
Right click on the column, and select Move All Fields for Export to move all the listed fields.
Select desired fields, right click on the column, and select Move Highlighted Fields to move only the selected fields.
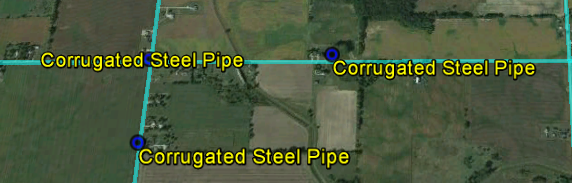
Select a label from the KML Label drop down list.
Google earth only displays labels for point features (sign, culvert, crash, etc.). It does not support labels for line layers at this time (road, guardrail, sidewalk, etc.). The figure below shows an example of point layer labels applied in Google Earth.
Select the folder icon to the right of the Export Path field to browse for a save location.
Select a location to save the file in the Browse For Folder window
Select the OK button.
Enter a distinct name for the file in the File Name field.
Select the Export button.
A KML File Created window will appear showing where you saved the file to.
Select the OK button.
Creating a Shapefile file with Roadsoft
In Roadsoft, make a selection.
Right-click on the map.
Select Google/Bing Integration from the list.
Select Save Selection as Shapefile.
Choose the desired fields to export from the list in the left column.
Right click on the column, and select Move All Fields for Export to move all the listed fields.
Select desired fields, right click on the column, and select Move Highlighted Fields to move only the selected fields.
Select the folder icon to the right of the Export Path field to browse for a save location.
Select a location to save the file in the Browse For Folder window
Select the OK button.
Enter a distinct name for the file in the File Name field.
Select the Export button.
A Shapefile Created window will appear showing where you saved the file to.
Select the OK button.